CloudAMQP has a mission to make it easy for developers to structure their software applications using microservices. This tutorial will de-mystify microservices!
Basic facts
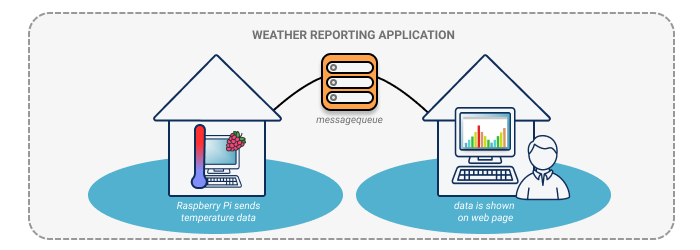
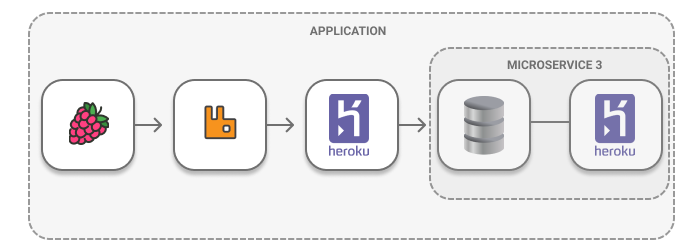
Our tutorial involves three microservices that, when used together, create a webpage that reports the weather. The architecture consists of, 1. A Raspberry Pi sending the temperature data via a message queue to 2. An application that stores the temperature data in a database, and finally 3. An application that displays the data on a simple webpage.
Five steps
To set up our three microservices, we need to explain five steps:
- An outline of microservice architecture, including an example of RabbitMQ for creating our weather webpage.
- The Heroku (PaaS) platform and how to set up an application using this platform.
- Raspberry Pi and a DHT11, the temperature and humidity module that collects weather data to be sent to the message queue.
- PostgreSQL, the database where the messages from the queue are added by the consumer application.
- The Python framework Flask, which is the application this tutorial uses to display the temperature data on a website.
But first…
Included within this tutorial are explanations, sample code, and to-do sections on what needs to happen before you go on to the next section.
Before you get started, ensure that you have a basic understanding of Git and how it works, as well as how to use the command line/terminal.
When the tutorial shows examples of code that begin with a dollar sign ($), these lines should be written into a terminal. However, the dollar sign itself is not part of the command line.
To-Do: Become familiar with Git$ python3
Python 3.7.4 (v3.7.4:e09359112e, Jul 8 2019, 14:54:52)The pip tool is a PyPA recommended tool for installing Python. Read more about how to install the pip tool here: Install pip.
Table of Contents
- Part 1: Microservices and message queues
- Part 1.1: What is a message queue and why would I use one?
- Part 1.2: Why not insert the data from the sensor straight into the database?
- Part 1.3: The architecture of a message queue
- Part 2: Heroku (PaaS)
- Part 2.2: Set up your first application (Microservice #2, “queue-to-database”)
- Part 2.3: Deploy to Heroku
- Part 2.4: Bind a message queue to the application
- Part 3: Raspberry Pi and the DHT11
- Part 3.1: Collect temperature data and publish collected data to the message queue
- Part 4: Database - Access temperature data and insert it into a database
- Part 4.1: What is a database?
- Part 4.2: Add a database to the microservice: “queue-to-database”
- Part 4.3: Access temperature data
- Part 4.4: Insert temperature data into the database
- Part 5: Flask Web Application - Show temperature data
- Part 5.1: Set up the web application in Heroku (Microservice 3)
- Part 5.2: Set up flask
- Part 5.3: Show data from the database in your web application
Section 1: Microservices and message queues
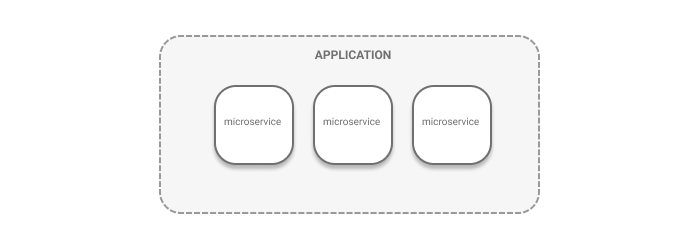
Individual microservices are self-contained and operate independently from other instances and services. Each microservice should be developed on its own, making the finished application the end result of all the microservices working together.
Microservice architecture involves highly decoupled, focused services working together to form a finished application. Decoupling describes the process of separating each service so that each one has its own self-contained function. When two or more systems are able to communicate autonomously, unaware of each other, and without being connected, the result is a decoupled system. Changing one system typically doesn’t require any modification to the other services. In our tutorial application, the Raspberry Pi is able to send weather data to the message queue even if the consumer system is undergoing maintenance and temporarily cannot send the information to the database.
1.1 Message queue - what is it and why use it?
Message queues allow applications to communicate by sending messages - data, often with header information - back and forth. One service must deliver the message to a predefined queue in order for another service to consume it. This consumer service processes the requests and information contained in the message itself. The message queue acts as a temporary storage area in case the destination service is not connected or busy with other tasks.
1.2 Why use a middle-man instead of adding data directly to the database?
- Less code = less breakage Complex one-piece applications have a greater potential to break down than microservice applications, where each service is a small amount of code with less potential to break.
- Data persists. If a process fails while data is being processed, unless the data is persisted it can be lost forever. Microservice architecture using message queues lessen the risk of lost data by keeping the data in the queue until it is processed or acknowledged. In fact, many message queues require the explicit indication that processing has completed before the message is removed from the queue, ensuring that data is kept safe until it is properly handled.
- Traffic Lots of activity and connections mean that the database is often busy handling messages and requests, leading to time outs. The database could be blocked by a long request, also leading to delays in processing and the dreaded time out.
- Message queues act as a middle layer, where all information is first added to a queue. The consumer application processes messages from the queue when the application is ready to handle them.
- Decoupling and different platforms. Decoupled architecture means flexibility as far as being able to use different applications and even different languages within those applications. For instance, writing code that collects data in C and the consumer application code in Python.
- Scaling is easy. Adding more consumers to the message queue is simple to do without having to change code or configurations.
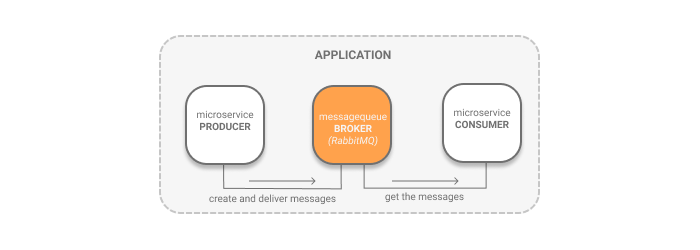
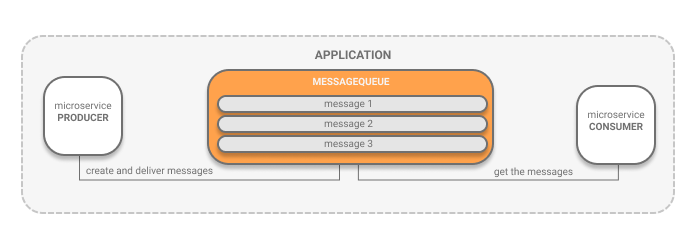
1.3 Message queue architecture
The basic architecture of a message queue is simple - client applications (producers) create messages that are delivered to a message queue. Other client applications (consumers) connect to the message queue and retrieve the messages for processing. Messages persist on the queue until the consumer retrieves them.
Section 2: Heroku (PaaS)
Heroku enables you to publish the application on the internet and provides a public URL in a fast, easy way. Known as a PaaS (Platform as a Service), Heroku cuts out the need to deal with servers and operates entirely within the cloud - building applications, running them, and operating them as well. It is an app platform, with management and instant scaling for development and production. All you have to do is sign up, download a few tools, upload your code to the platform and you’re online.
2.1 Create an account in Heroku
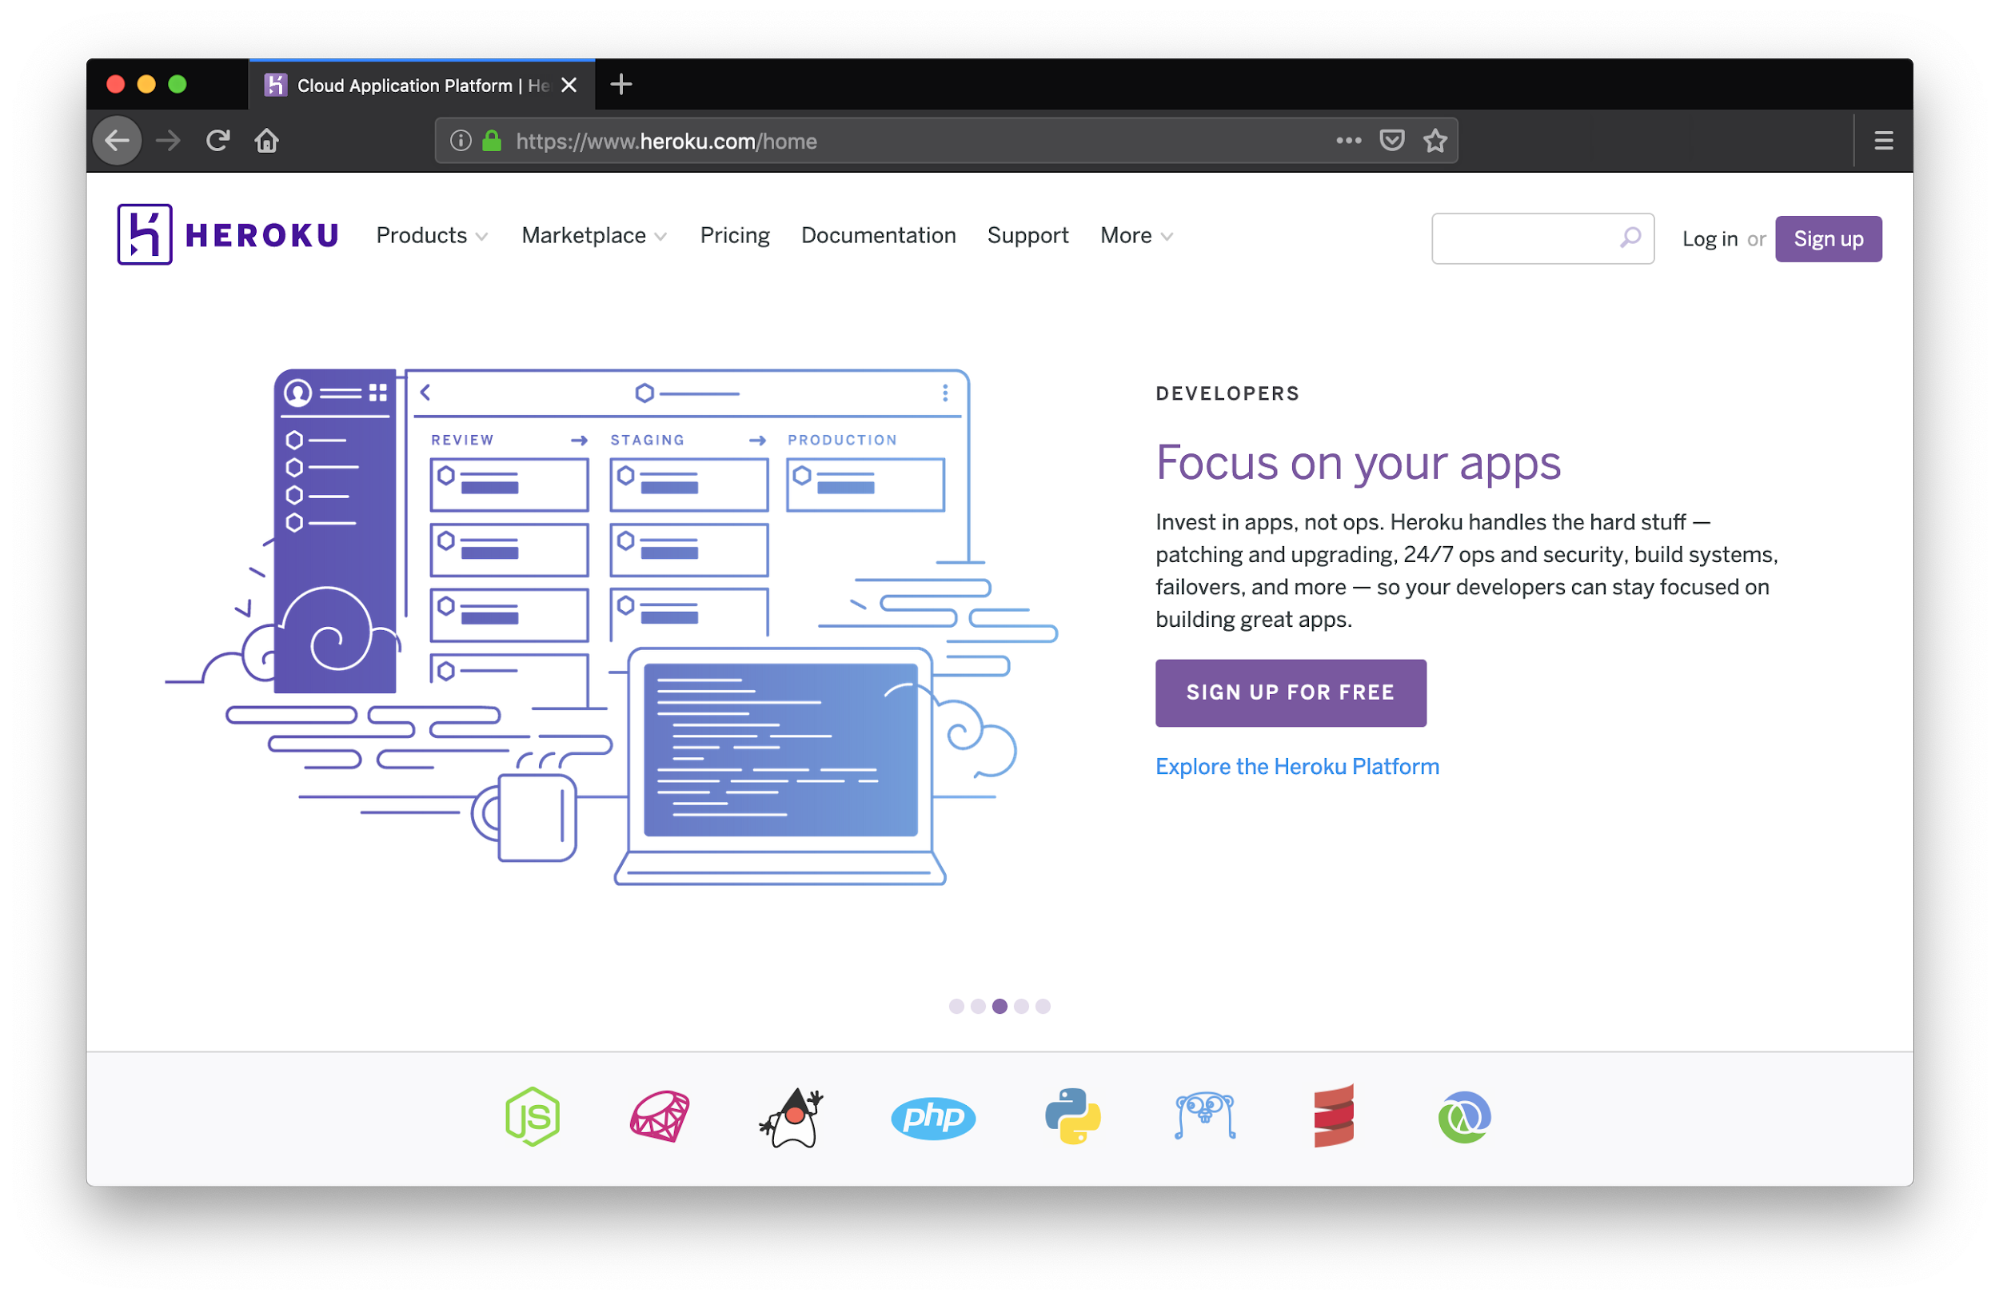
Being with creating your Heroku account, unless you already have one, using the home page here: https://www.heroku.com/home
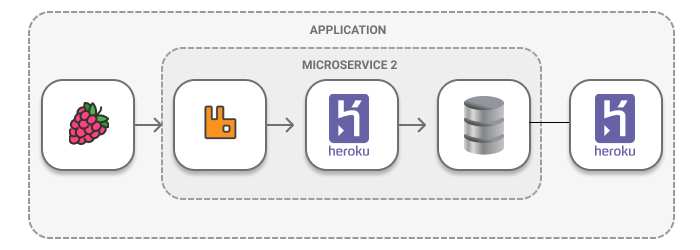
2.2: Set up Microservice 2
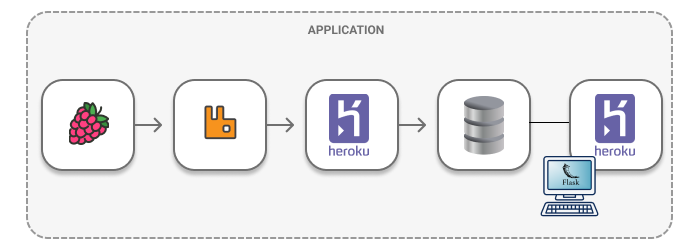
This microservice will be the heart of this tutorial’s architecture. Microservice 2 grabs the weather data from the message queue and adds it to the database, as shown below:
To make this work, install the Heroku Command Line Interface (CLI), which is used to manage and scale the application, provision add-ons, view application logs, and run the application locally. Once installed, use a command shell to run Heroku commands. Log on to the Heroku CLI using the login command:
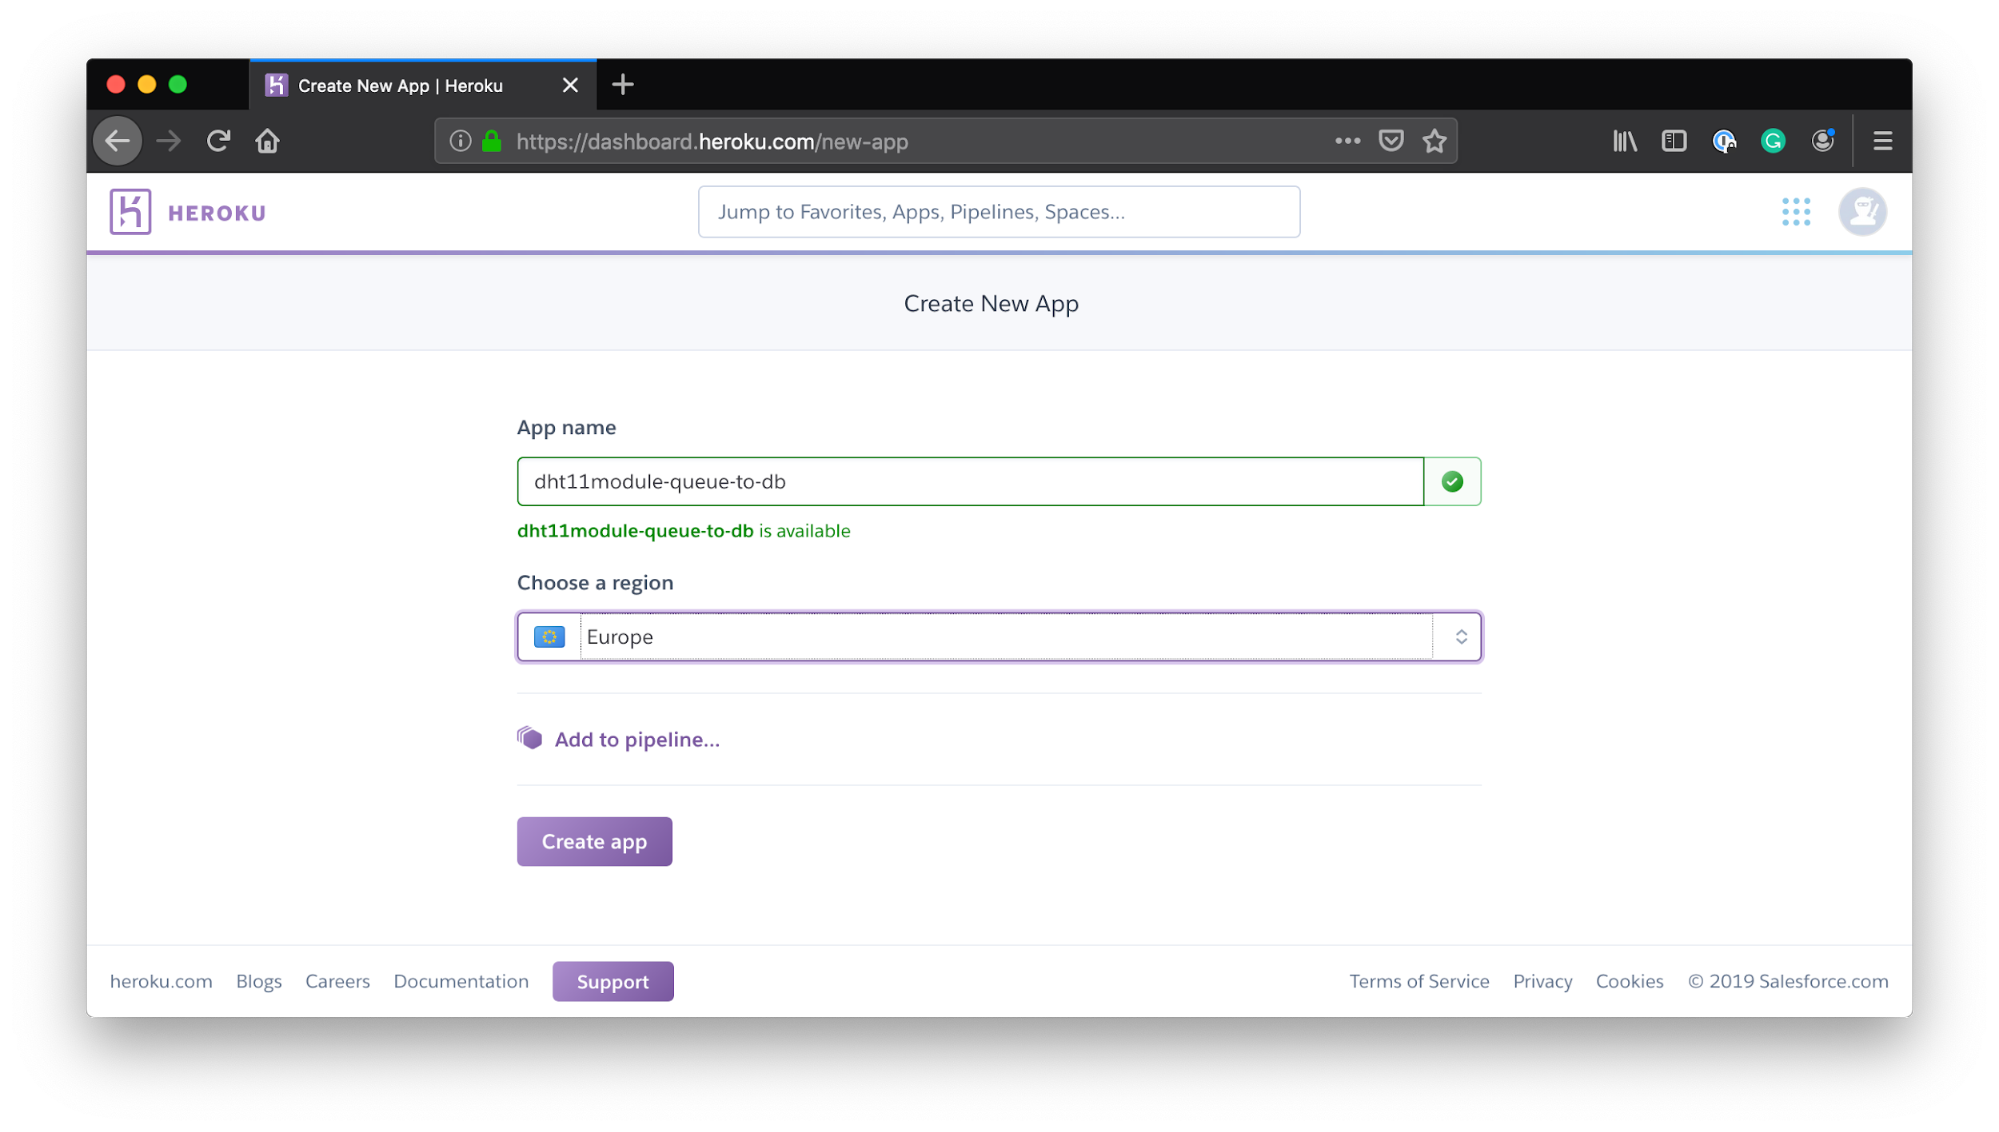
$ heroku loginUsing the Web UI or the terminal is the way to create an application in Heroku. The example in this tutorial is named dht11module-queue-to-db and the Python language is selected.
Write the following line or navigate to the Create New App page, as shown below:
$ heroku create dht11module-queue-to-db --buildpack heroku/python
Next, you must set up the application’s structure. To do so, a requirements file is needed for Heroku to know how to run the application and install the appropriate Python packages. This file can be created using the freezing command in pip, which reads the versions of all installed packages in a local, virtual environment, producing a text file for each Python package specified.
$ pip freeze > requirements.txtAnother file named app.py must be created, with the following “Hello world” code inside, which validates that Python3 has been installed and is able to run the application locally.
print (“Hello world. This line will be printed.”)
To-Do: Create the requirements file in the new application’s folderTest run the application using “python3 app.py” in the terminal:
$ python3 app.py
> Hello world. This line will be printed.2.3 Run the code from Heroku
After a successful test of your code locally, it’s time to run the same thing via Heroku. Using your Heroku git URL, set the git remote to Heroku - in this case, https://git.heroku.com/dht11module-queue-to-db. Write the following to the service project catalog, where dht11module-queue-to-db is your app name:
$ heroku git:remote -a dht11module-queue-to-dbPush the code to Heroku:
$ git add *
$ git commit -m "init"
$ git push heroku master
Run a test by connecting to Heroku and running the app in the cloud:
$ heroku run bash --app dht11module-queue-to-db
> Running bash on ⬢ dht11module-queue-to-db... up, run.4825 (Free)
$ python3 app.py
> Hello world. This line will be printed.2.4: Message queue to application binding
Now that the application is in Heroku, it is very easy to bind a service to it. There are more than 150 Heroku add-ons to choose from in the Elements Marketplace. Everything you need to speed up the development cycle and become more efficient can be found right in the marketplace. The following example will show you how to bind a message queue to an application and use RabbitMQ via the Heroku Add-on service CloudAMQP. Known as a Saas (Software as a Service), in this case, CloudAMPQ is actually RabbitMQ as a service, a software distribution model.
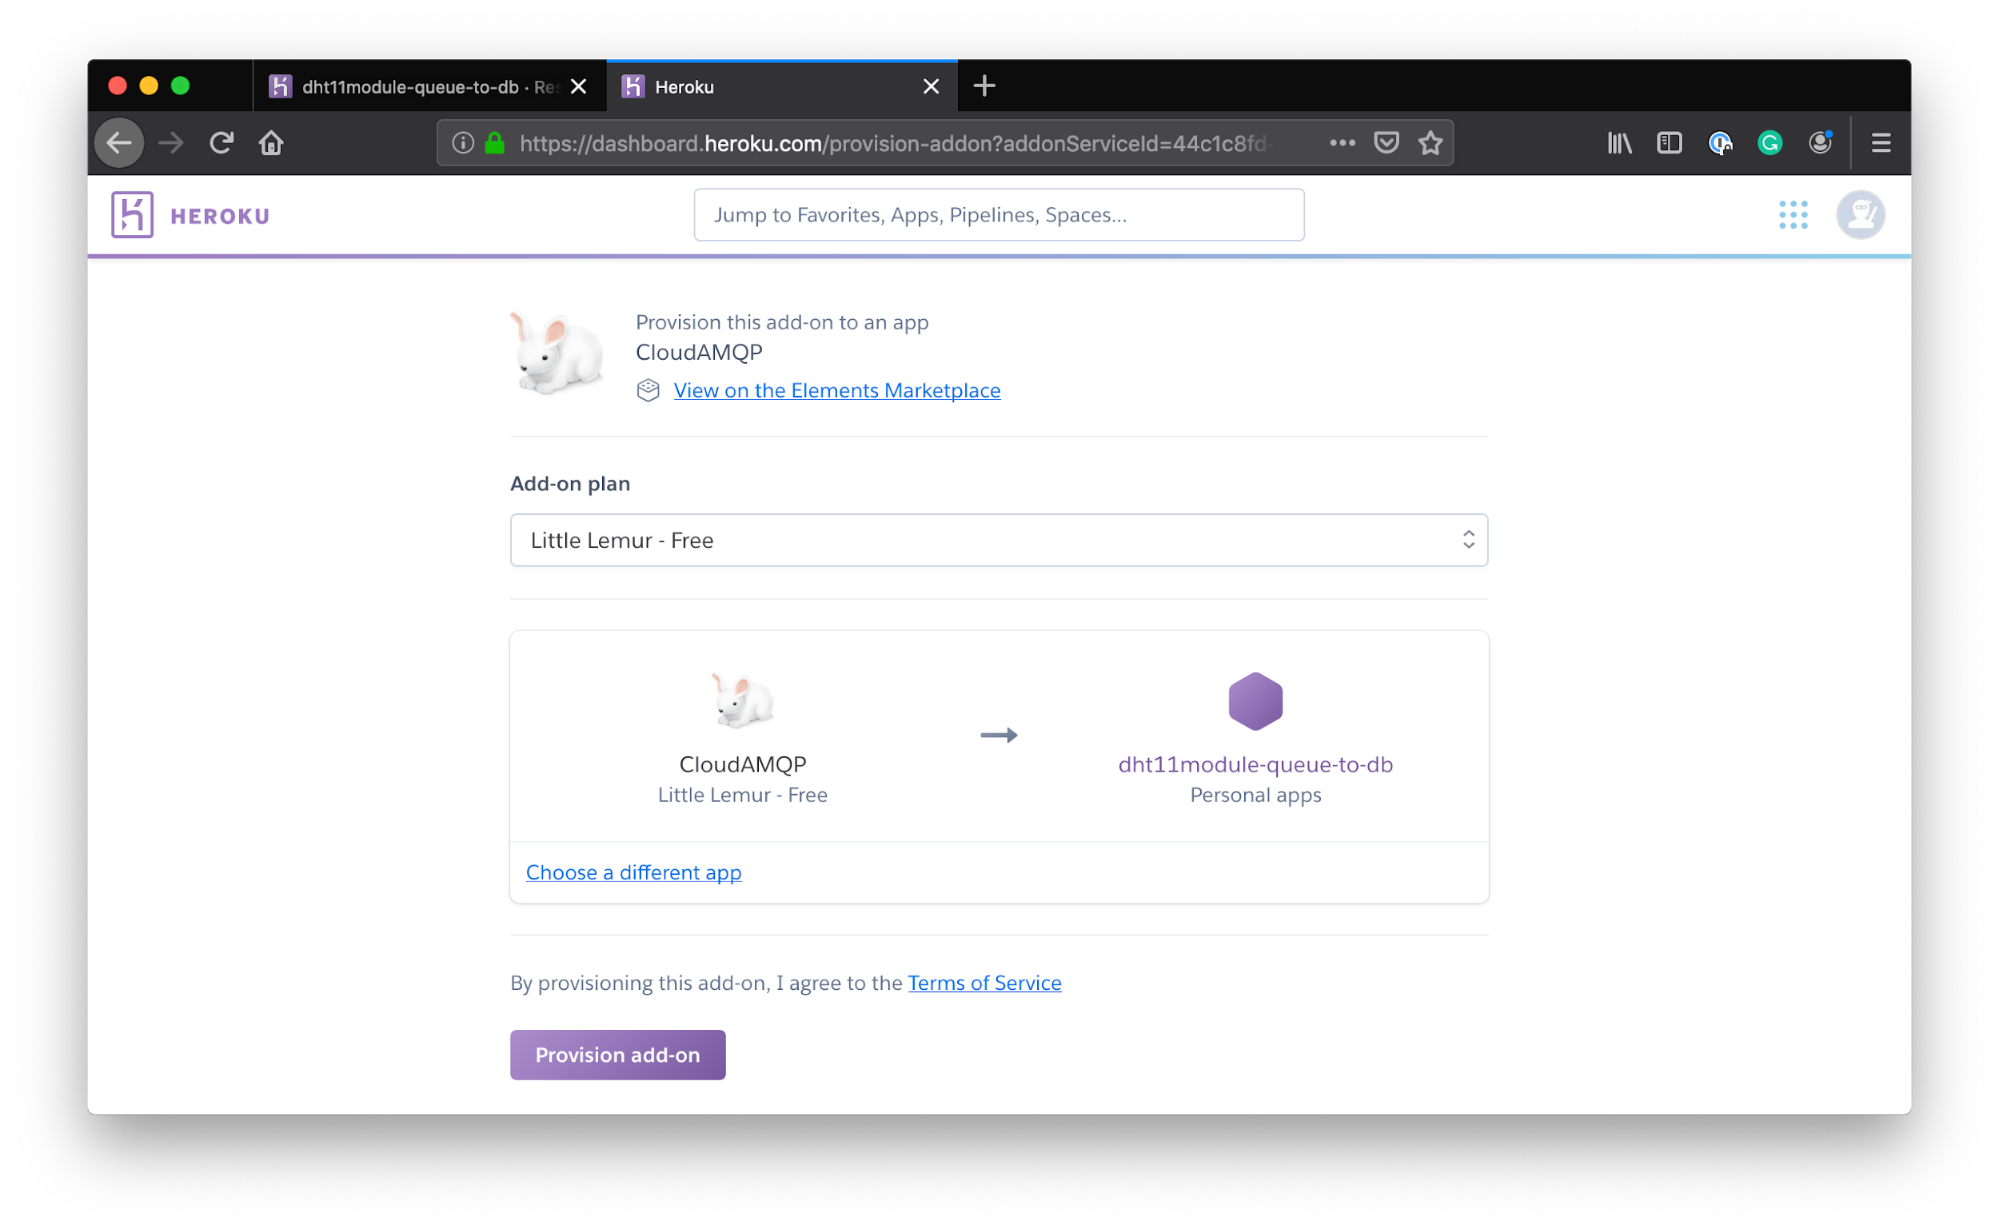
The terminal can be used to add the RabbitMQ message queue add-on to the application:
$heroku addons:create cloudamqp:lemurRead more about Python and Heroku here: https://devcenter.heroku.com/articles/getting-started-with-python
Section 3: Microservice 1
Even if you don’t have access to a Raspberry Pi, this section is very useful as it includes full code that can be used in place of a Raspberry Pi.
The Raspberry Pi in our tutorial is used with the DHT11 sensor, a module that provides data on temperature and humidity. Easy to set up, it only requires one wire for the data signal. Use this setup guide to complete the next to-do: http://www.circuitbasics.com/how-to-set-up-the-dht11-humidity-sensor-on-the-raspberry-pi/
To-Do: Set up Raspberry Pi with DHT11 sensor3.1 Collect data and publish to the message queue
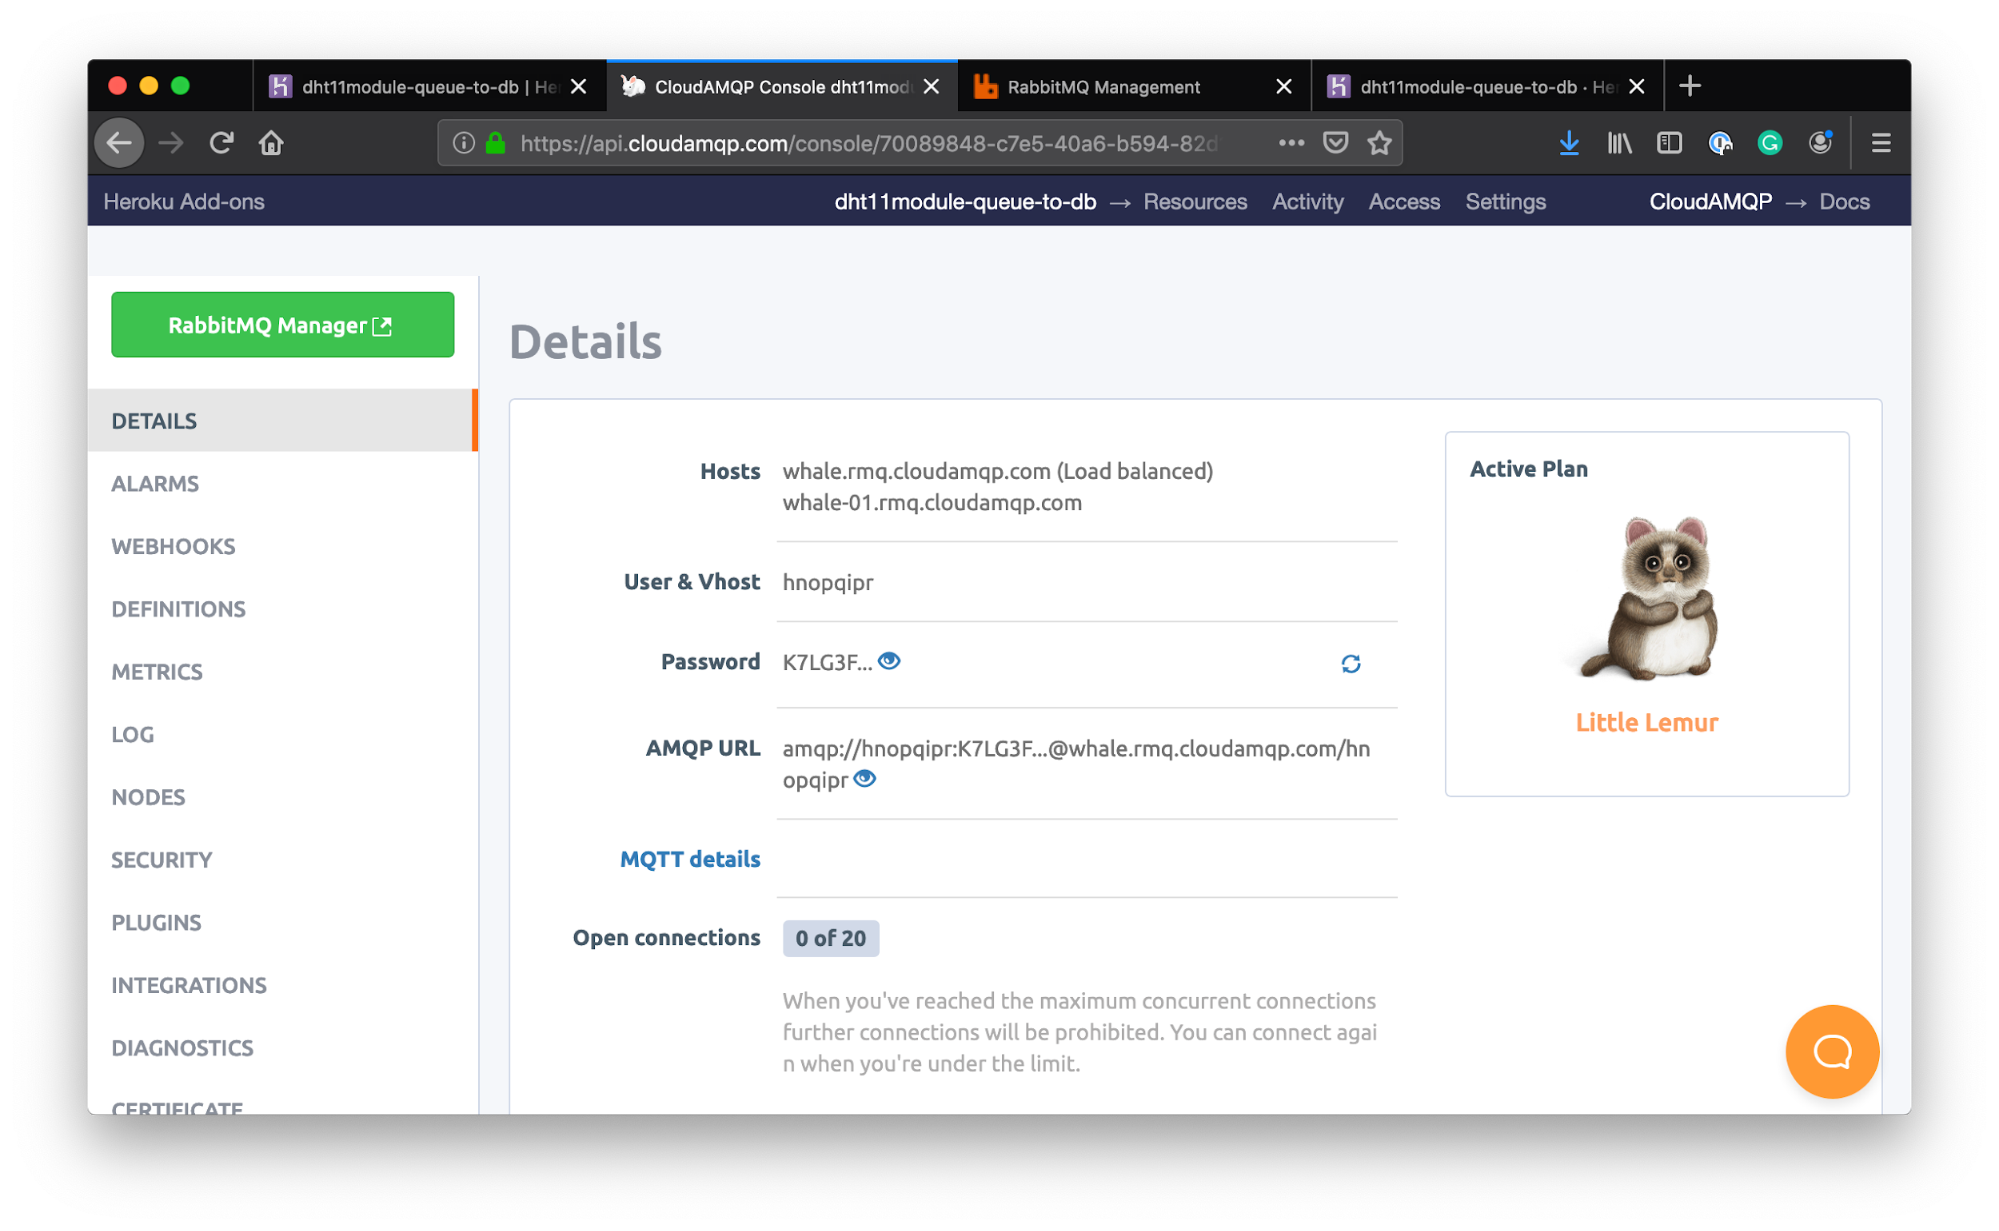
An environment variable for CloudAMQP must be set up in your Pi, adding the URL information. Details like the connection URL, server name, user/vhost, and password on your CloudAMQP instance can be found on the details page as shown below:
The following code is used to collect data on temperature and humidity, add it to a message, and send it to RabbitMQ:
#microservice number 1, Raspberry Pi sending data to Microservice number 2
import pika
import os
import time
import json

message_interval = 20  # seconds
reading_interval = 5  # seconds
sensor = 11 # might need to be changed depending on the pi setup
pin = 4 # might need to be changed depending on the pi setup

#Access the CLODUAMQP_URL environment variable
url = os.environ.get('CLOUDAMQP_URL')
params = pika.URLParameters(url)
connection = pika.BlockingConnection(params)
# start a channel
channel = connection.channel()
# Declare a queue
channel.queue_declare(queue='weather')

isSimulation = 1
if isSimulation:
  import random
  def genrand():
      return random.random(), random.random() * 10
else:
  import Adafruit_DHT

while True:
  body = []
  timeout = time.time() + message_interval
  while True:
    if time.time() > timeout:
      break
    if isSimulation:
      humidity, temperature = genrand()
    else:
        humidity, temperature = Adafruit_DHT.read_retry(sensor, pin)

    read_time = time.time()
    d = {'t': read_time, 'T': temperature, 'H': humidity}
    body.append(d)
    time.sleep(reading_interval)

    print('sending data')
    channel.basic_publish(exchange='',
                        routing_key=''weather'',
                        body=json.dumps(body))

connection.close()The message flow can now be observed by entering the management interface for RabbitMQ, found by opening the CloudAMQP add-on and clicking on RabbitMQ Manager:
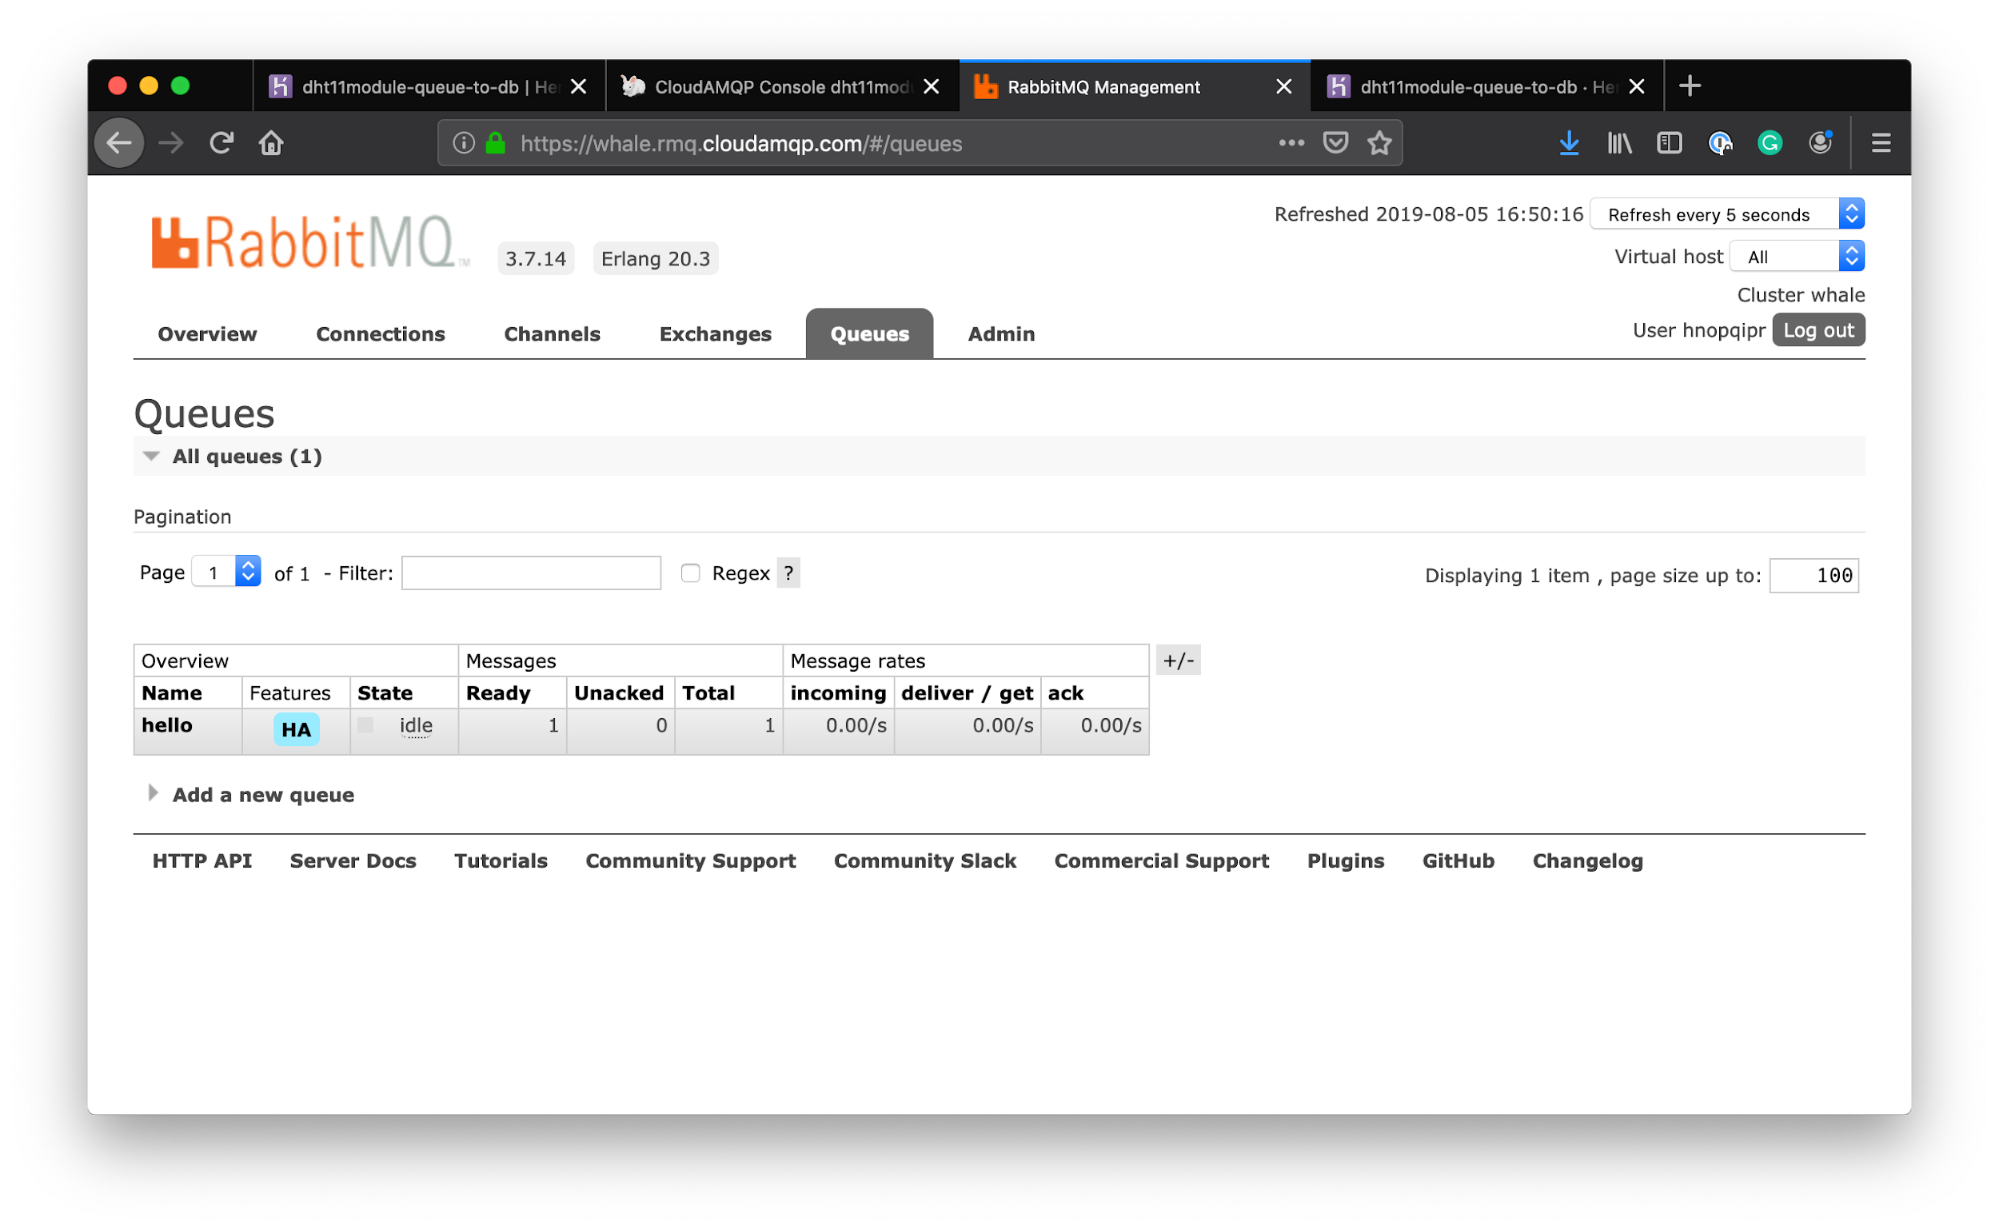
RabbitMQ Manager is an interface for monitoring and handling your RabbitMQ server via a web browser. Among other tasks, creating, listing, and deleting queues and connections can be performed using this interface. You can also monitor message rates or send and receive messages manually. For more information about the management interface, click here: https://www.cloudamqp.com/blog/2015-05-27-part3-rabbitmq-for-beginners_the-management-interface.html
Section 4: Access temperature data and add it to the database
So far, we have sent data from the Raspberry Pi application to the message queue. Next, we will store this information in a database. This operation also takes place within Microservice 2.
4.1 What is a database?
A database organizes and stores information, making it useful for searches and other uses. Modern software architecture often deploys databases as part of the structure. For example, almost every e-commerce experience consists of a database of products, while every website that requires user logins has a database storing information on users.
Databases usually contain one or more tables, which may each include multiple different fields of information. Each table is made up of rows and columns like a spreadsheet. The example below is of a table that stores the timestamp, temperature and, later on, the humidity information:
| Timestamp | Temperature | Humidity |
| 2019-06-10 10:00:00 | 15 | 95 |
| 2019-06-09 10:00:00 | 17 | 98 |
4.2: Add a database to the Microservice
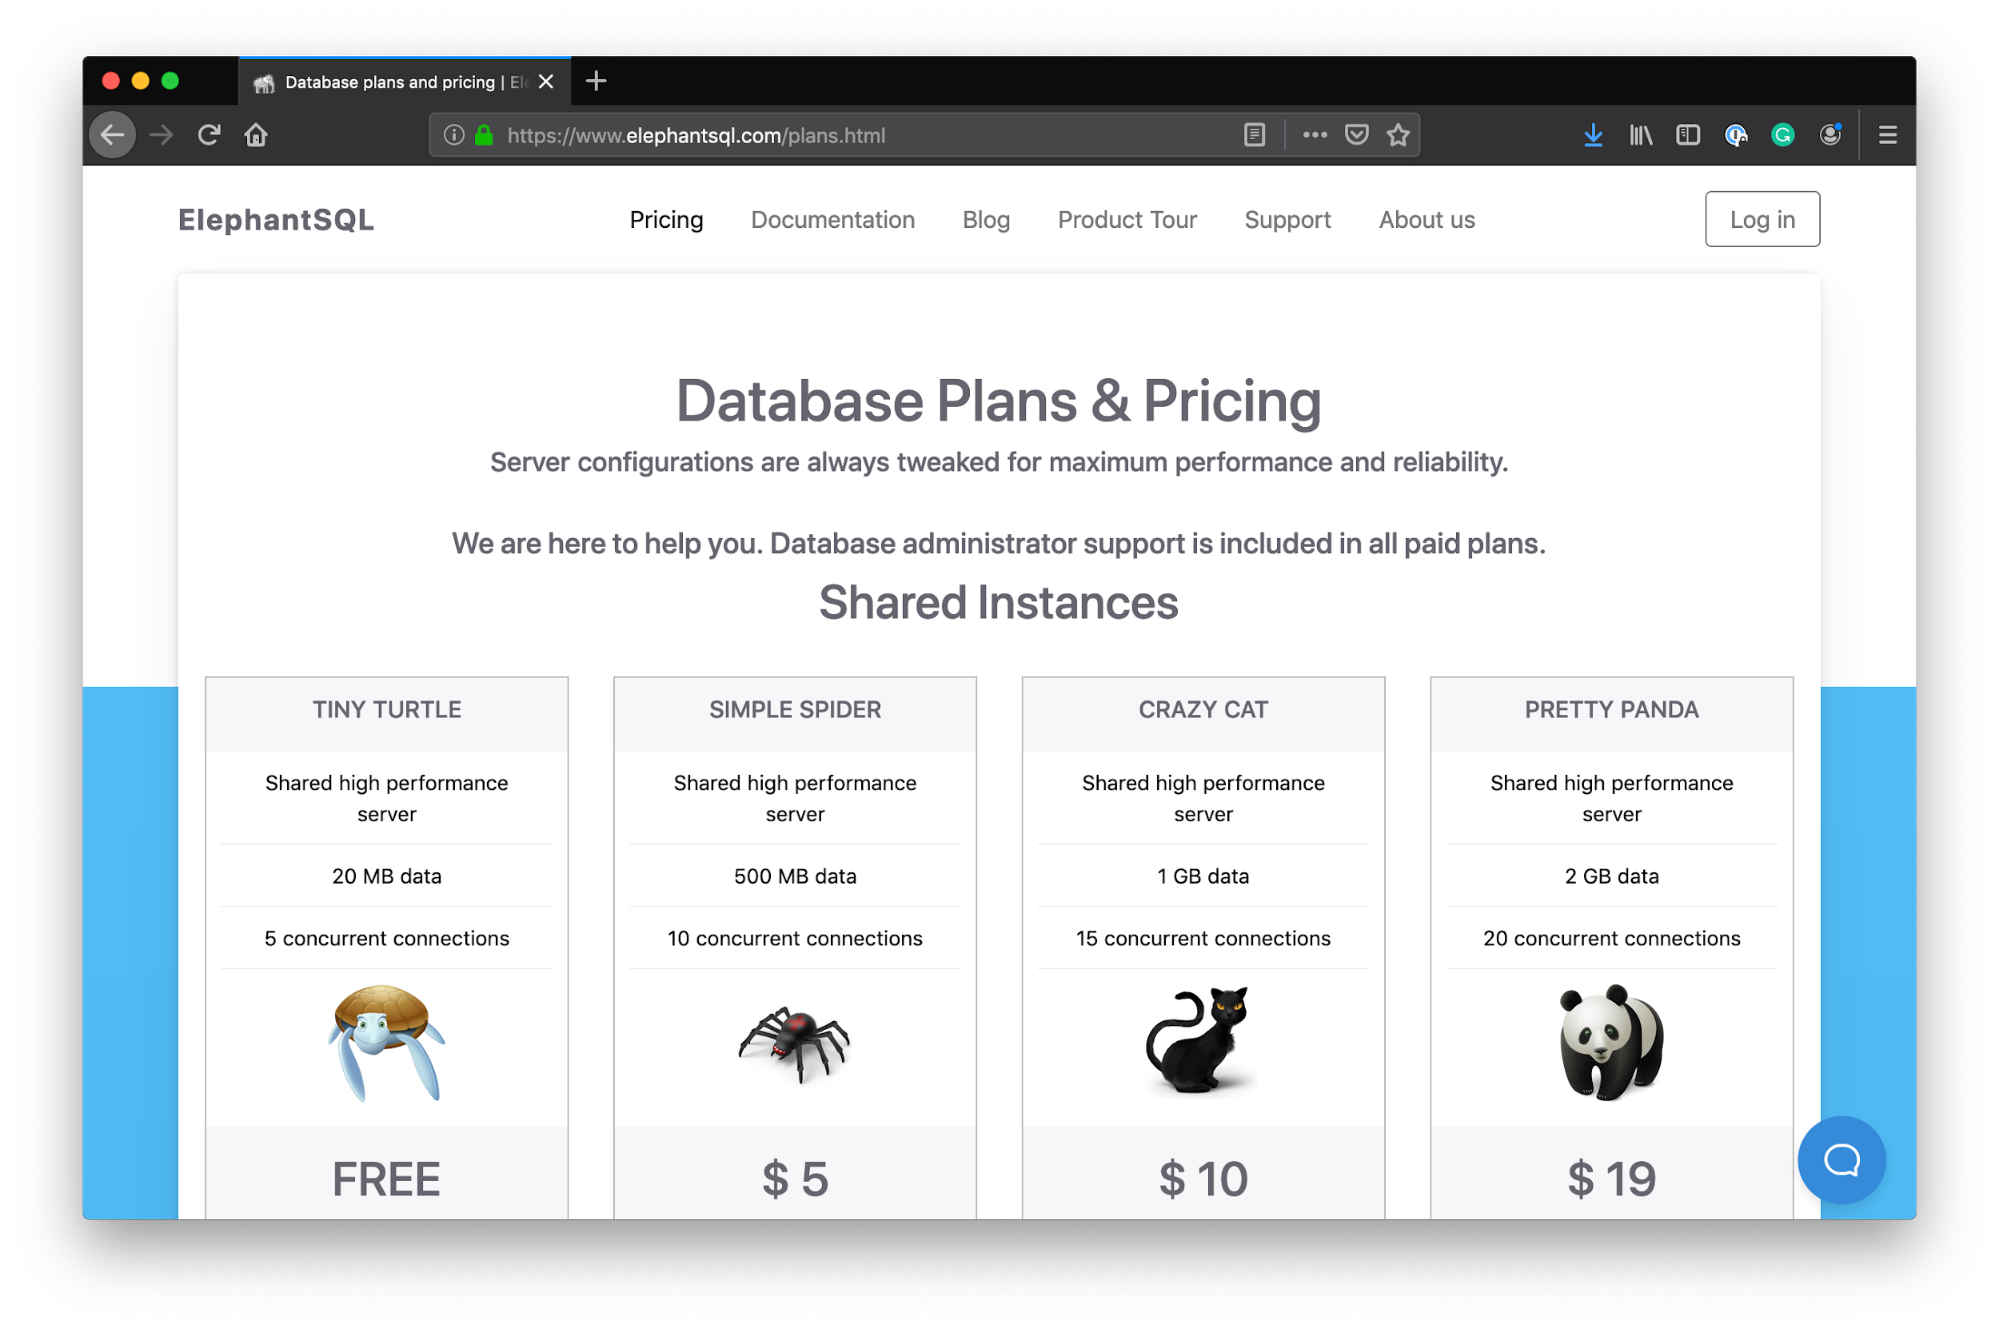
The example below uses ElephantSQL (PostgreSQL as a Service) to add a database to the application via the free plan:
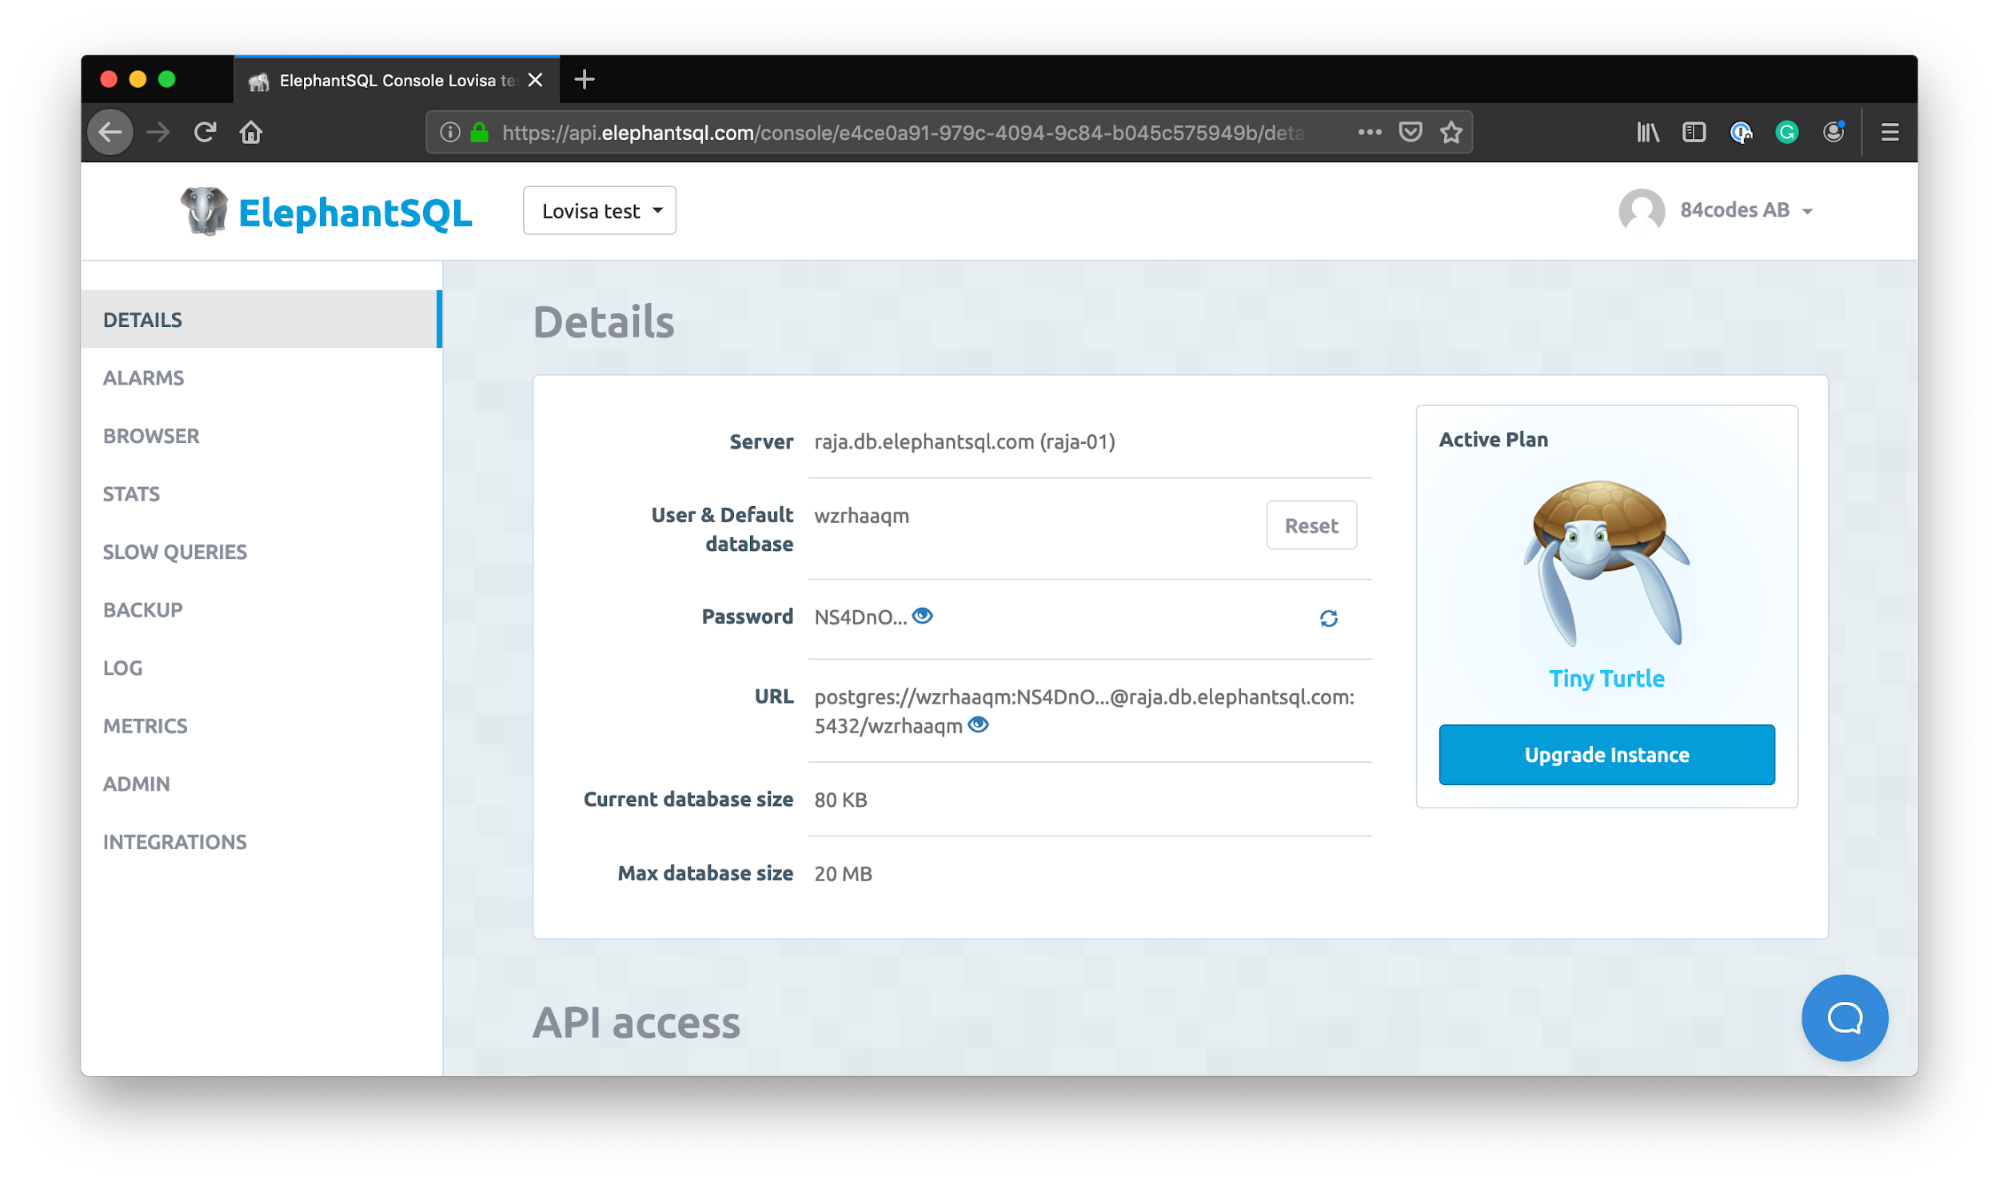
Set DATABASE_URL as the environment variable to point to ElephantSQL (remote), and to the local machine for backup purposes. Find the connection string for ElephantSQL in the Details page.
To-Do: Add the connection string to the DATABASE_URLThe example below is the code that connects the application and the database and prints the information about the database. Run this code to ensure that the connection is set up correctly and working.
#example of how to store data in a database with pyscopg2
import pika, os
import urllib.parse as up
import psycopg2

try:
  up.uses_netloc.append("postgres")
  url = up.urlparse(os.environ["DATABASE_URL"])
  connection = psycopg2.connect(database=url.path[1:],
    user=url.username,
    password=url.password,
    host=url.hostname,
    port=url.port
  )

#Print PostgreSQL Connection properties
print ( connection.get_dsn_parameters(),"\n")
#Print PostgreSQL version
cursor.execute("SELECT version();")
record = cursor.fetchone()
print("You are connected to - ", record,"\n")
except (Exception, psycopg2.Error) as error :
print ("Error while connecting to PostgreSQL", error)
finally:
  #closing database connection.
  if(connection):
    connection.close()
print("PostgreSQL connection is closed")4.3 Collect temperature data and add it to the database
Next, you will collect the temperature data from the message queue and permanently store it in the database. Show below is the code that connects to RabbitMQ to access a message for database storage:
#microservice number 2, receives data from a message queue and stores in a database
import pika, os
import urllib.parse as up
import psycopg2
from datetime import datetime
import json

#Access the CLODUAMQP_URL environment variable and parse it (fallback to localhost)
url = os.environ.get('CLOUDAMQP_URL', 'amqp://guest:guest@localhost:5672/%2f')
params = pika.URLParameters(url)
connection = pika.BlockingConnection(params)
channel = connection.channel() # start a channel
channel.queue_declare(queue='weather') # Declare a queue

def store(ch, method, properties, body):
body = json.loads(body)
print("[X] Received time:" + str(body["t"]) + " and temperature: " + str(body["T"]))
try:
  up.uses_netloc.append("postgres")
  url = up.urlparse(os.environ["ELEPHANTSQL_URL"])
  connection = psycopg2.connect(database=url.path[1:],
    user=url.username,
    password=url.password,
    host=url.hostname,
    port=url.port
  )
  cursor = connection.cursor()
  cursor.execute("CREATE TABLE IF NOT EXISTS weather (id SERIAL PRIMARY KEY, time TIMESTAMP, temperature integer);")

  postgres_insert_query = """ INSERT INTO weather (TIME, TEMPERATURE) VALUES (%s,%s)"""
  record_to_insert = ((body["t"]), int(body["T"]))
  cursor.execute(postgres_insert_query, record_to_insert)
  connection.commit()
  count = cursor.rowcount
  print (count, "Record inserted successfully into weather table")

  except (Exception, psycopg2.Error) as error :
    print ("Error while connecting to PostgreSQL", error)
  finally:
    #closing database connection.
    if(connection):
      connection.close()
      print("PostgreSQL connection is closed")

  channel.basic_consume('weather',
    store,
    auto_ack=True)

  print(' [*] Waiting for messages:')
  channel.start_consuming()
  connection.close()
The full code (access | subscribe | store) can be found in the link here: https://github.com/lovisajohansson/python-cloudamqp-elephantsql
Note: if you have a RaspberryPi, remove the part of the code that talks about publishing a message.
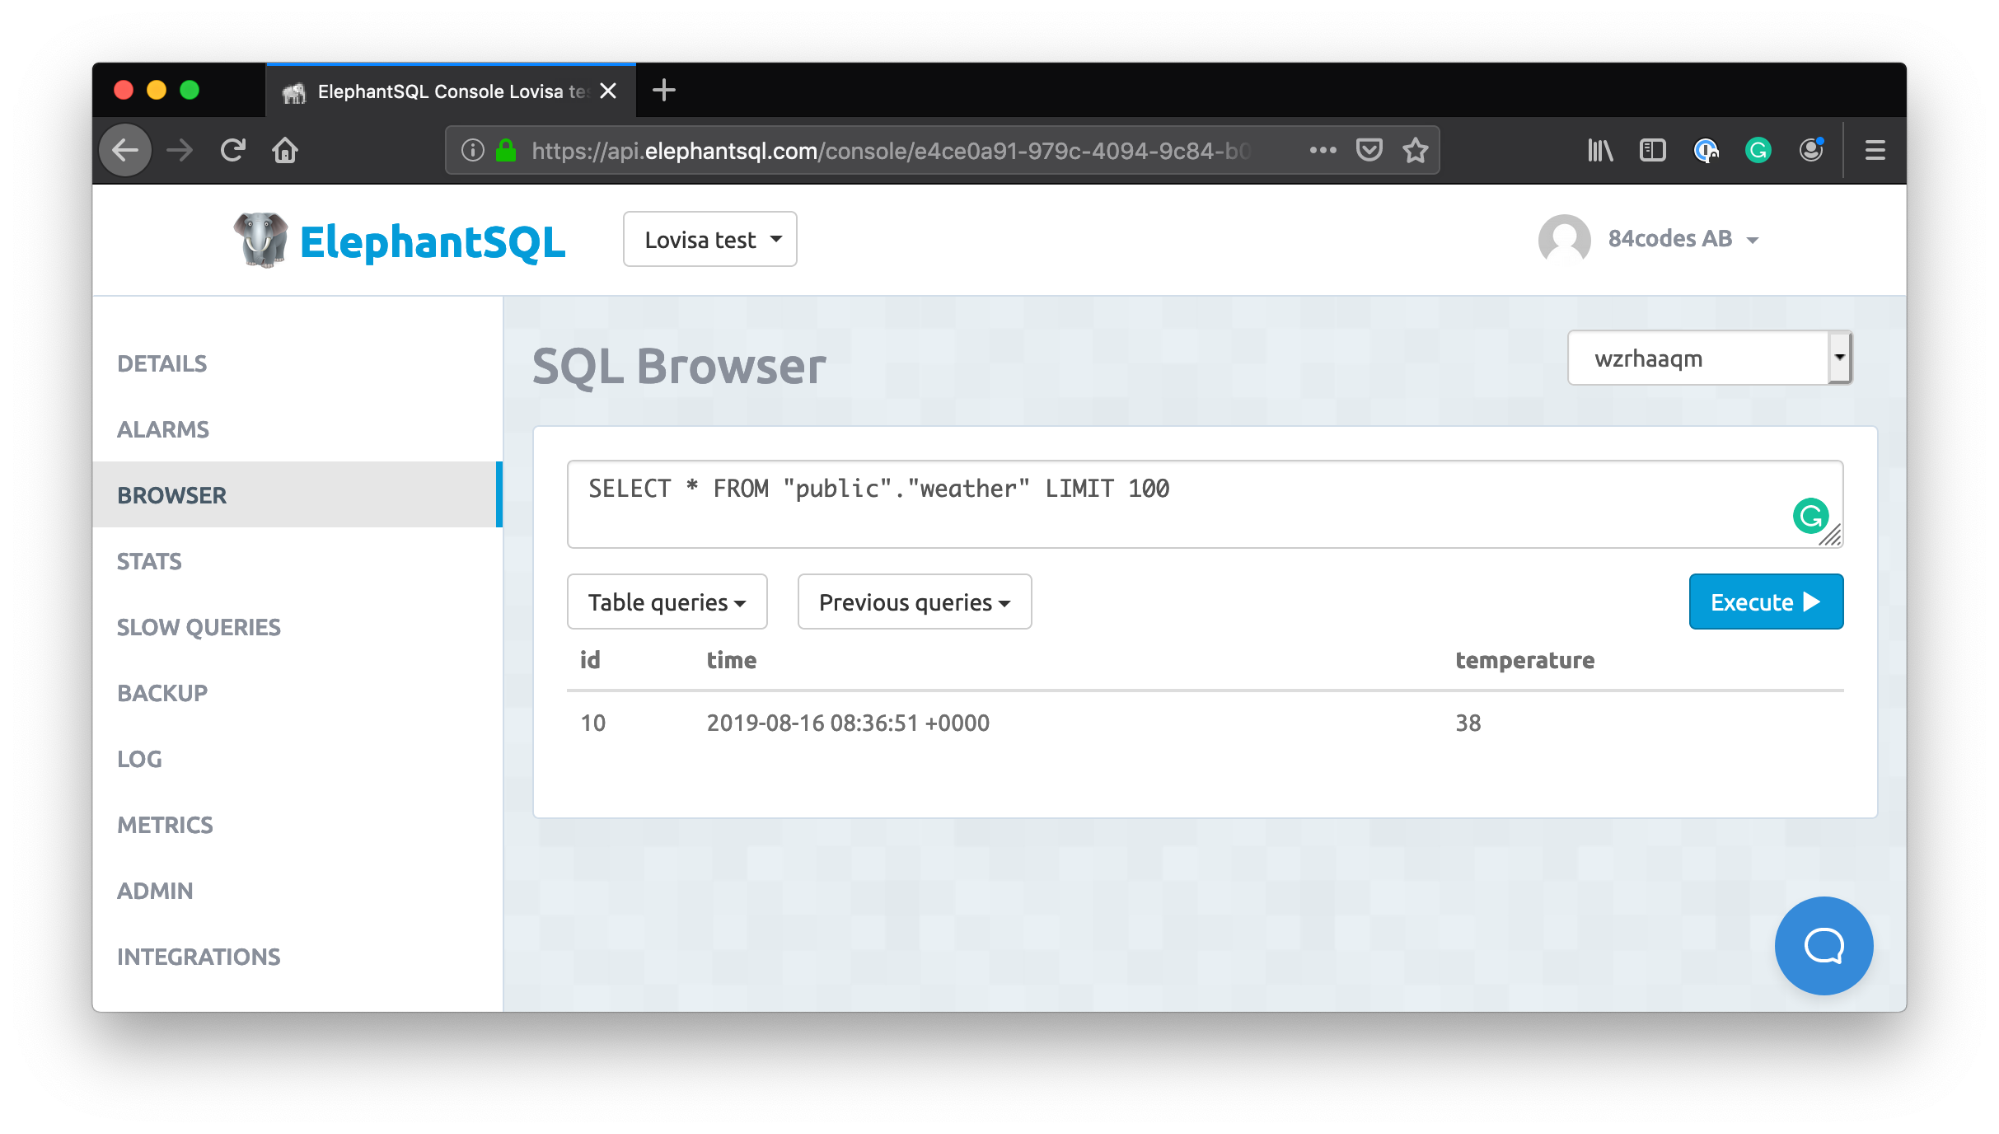
To-Do: Download the code, verify the connection with the message queue, access a message, and insert the data in the databaseView the database and the newly inserted data via the ElephantSQL browser - write “SELECT * from WEATHER” and you will see a list of all data in the table:
Section 5: Show temperature data
Up next: Microservice 3 - the final microservice, tasked with showing the full database information on a web page. To build this microservice, we will use a Python development framework called Flask, which is meant for building web applications like the one in our tutorial.
5.1 Set up the web application
Microservice 3 will be set up on Heroku using the web UI or the terminal, as described in Section 1. Name the application “mytemperature” and set Python as the language.
Navigate to “Create New App” as shown below or write the following line if you are using the terminal:
$ heroku create mytemperature --buildpack heroku/pythonInstall the dependencies for Flask - in this case, the Gunicorn libraries. Gunicorn, or Green Unicorn, is a Python Web Server Gateway Interface (WSGI) HTTP server that runs Python web application code. Use pip to install those dependencies:
$ pip install flask gunicornCreate a requirements file by running the freezing command again and note that both Flask and Gunicorn are added to the file.
$ pip freeze > requirements.txtFor this application, you must create a text file named Procfile in the root of the application, which will provide a list of the process types. Create the Procfile and add the code shown below, which specifies the webdyno with gunicorn as the http server:
web: gunicorn app:app --log-file -Use https://git.heroku.com/mytemperature and to set git remote to Heroku and write the following in the project catalog for the service:
$ heroku git:remote -a mytemperatureNext, push the new code to Heroku:
$ git add *
$ git commit -m "init"
$ git push Heroku master5.2: Set up Flask
To create a base Flask application, copy the code below to a file you create and name app.py:
from flask import Flask
app = Flask(__name__)

@app.route('/')
def hello_world():
  return 'Hello World!'

  if __name__ == '__main__':
  app.run()
Run a test using the following command:
$ python3 app.pyThe app should now be running on localhost:5000.
To-Do: Write a Hello world Flask application and view it on localhostRun this app on the web by pushing the code to Heroku and using the following command:
$ heroku openThe app should now be running on your web URL, in this case: https://showtemperature.herokuapp.com/
To-Do: Run the Hello world code on Heroku5.3 Display the database info on the web application
Using the environment variable DATABASE_URL, add the connection string for the database URL.
To-Do: Add the database connection URLNote: We recommend that you download the full code for this portion here: https://github.com/lovisajohansson/python-flask-elephantsql
The code examples below are shown by section, according to the files needed:
Create a config.py file to read the connection URL from the environment variable and add the following lines:
import os
class Config(object):
SQLALCHEMY_DATABASE_URI = os.environ['DATABASE_URL']Insert the code below on a file you create named app.py, which will connect the database and route it to a (yet to be created) webpage to display the data:
from flask import Flask, render_template, request
from flask_sqlalchemy import SQLAlchemy

database_uri = 'postgresql+psycopg2://{dbuser}:{dbpass}@{dbhost}/{dbname}'.format(
  dbuser=os.environ['DBUSER'],
  dbpass=os.environ['DBPASS'],
  dbhost=os.environ['DBHOST'],
  dbname=os.environ['DBNAME']
)

app = Flask(__name__)

app.config.update(
  SQLALCHEMY_DATABASE_URI=database_uri,
  SQLALCHEMY_TRACK_MODIFICATIONS=False,
)

#initialize the database connection
db = SQLAlchemy(app)

@app.route('/')
def view_registered_weathers():
  from models import Weather
  weathers = Weather.query.all()
  return render_template('weather.html', weathers=weathers)

if __name__ == '__main__':
app.run()Create a model file named models.py, which will determine the logical structure of the database, and add the code below:
from app import db

class Weather(db.Model):
  """Simple database model to track weather."""

  __tablename__ = 'weather'
  id = db.Column(db.Integer, primary_key=True)
  time = db.Column(db.DateTime)
  temperature = db.Column(db.Integer)

  def __init__(self, time=None, email=None):
  self.time = time
  self.temperature = temperature
TODO: Create models.py and insert the code for the weather model
Create the HTML page that shows the data by first creating a new folder named templates. Two files are added into this folder - base.html , and weather.html. Base.html includes the base structure for all HTML pages and weather.html includes the table containing weather data.
base.html
<!DOCTYPE html>
<html lang="en">
<head>
  {% block head %}
  <title>{% block title %}{% endblock %}</title>
  <link rel="stylesheet" href="https://maxcdn.bootstrapcdn.com/bootstrap/3.3.7/css/bootstrap.min.css" integrity="sha384-BVYiiSIFeK1dGmJRAkycuHAHRg32OmUcww7on3RYdg4Va+PmSTsz/K68vbdEjh4u" crossorigin="anonymous">
  <link rel="stylesheet" href="https://maxcdn.bootstrapcdn.com/bootstrap/3.3.7/css/bootstrap-theme.min.css" integrity="sha384-rHyoN1iRsVXV4nD0JutlnGaslCJuC7uwjduW9SVrLvRYooPp2bWYgmgJQIXwl/Sp" crossorigin="anonymous">
  <script src="https://maxcdn.bootstrapcdn.com/bootstrap/3.3.7/js/bootstrap.min.js" integrity="sha384-Tc5IQib027qvyjSMfHjOMaLkfuWVxZxUPnCJA7l2mCWNIpG9mGCD8wGNIcPD7Txa" crossorigin="anonymous"></script>
  {% endblock %}
</head>
<body>
    <div id="content" style="max-width: 500px; padding:10px;">{% block content %}{% endblock %}</div>
</body>
</html>
weather.html
{% extends "base.html" %}
{% block title %}Registered weather data{% endblock %}
{% block head %}
{{ super() }}
{% endblock %}
{% block content %}
<h1>Registered weather data</h1>
<table class="table table-striped">
<thead>
<tr>
  <th>Time</th>
  <th>Temperature</th>
</tr>
</thead>
<tbody>
{% for weather in weathers %}
  <tr>
  <td>{{ weather.time }}</td>
  <td>{{ weather.temperature }}</td>
  </tr>
{% endfor %}
</table>
{% endblock %}
Finished! Now run that code! You should see a table of the data that is stored in the database.
$python3 app.py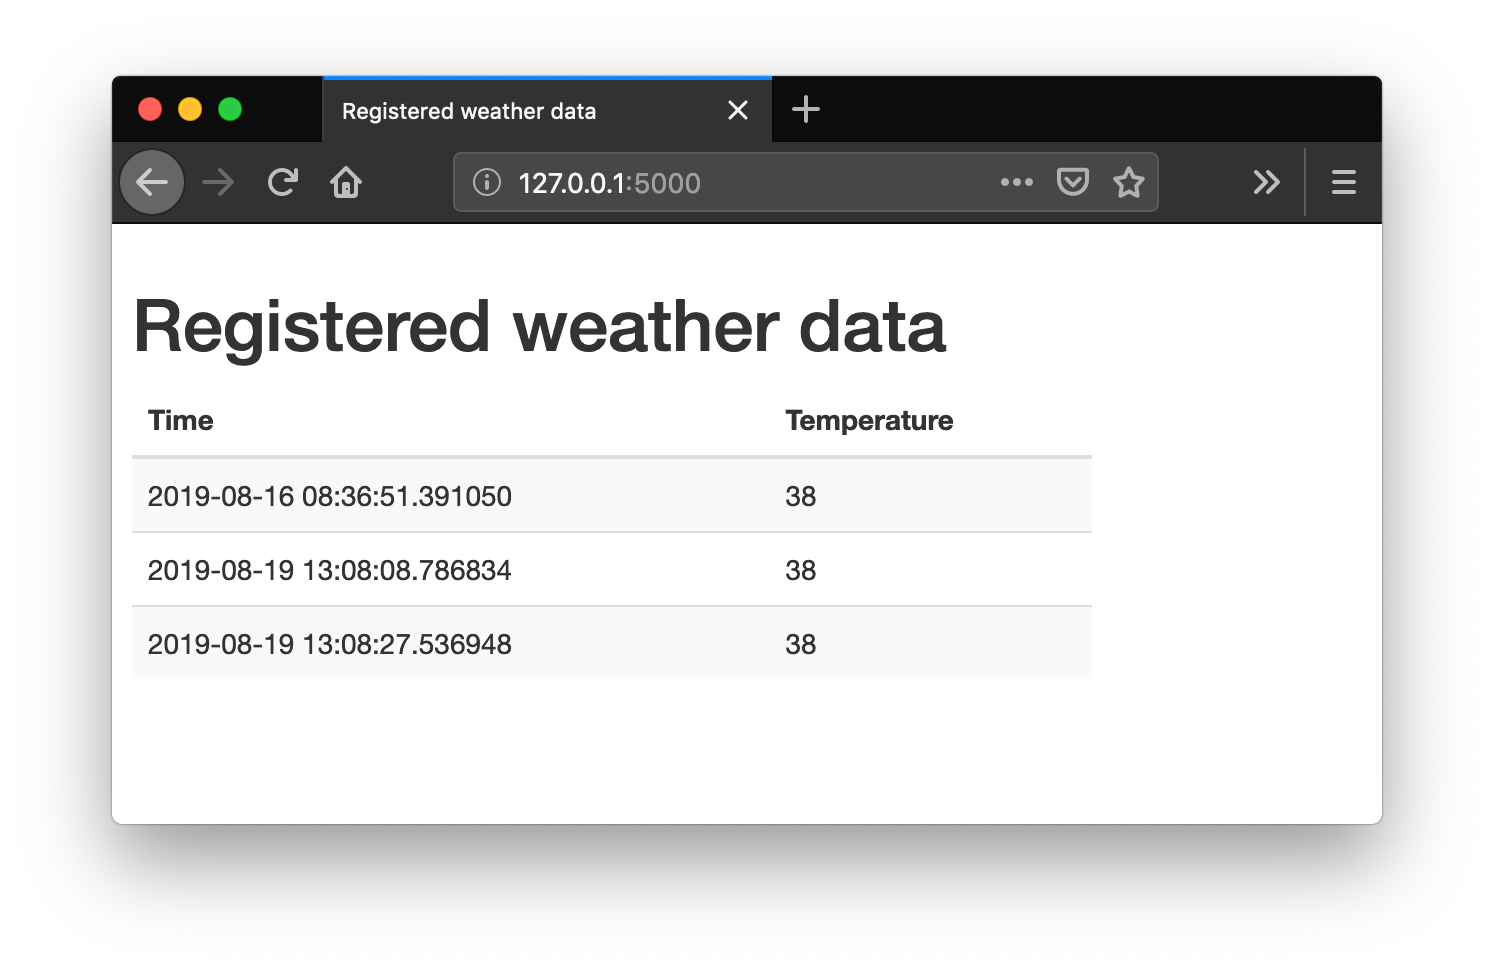
Summary
This tutorial has shown you how to use three microservices to create a weather reporting webpage:
- Python, pip tool (language, installer)
- Heroku using CLI or web UI (Paas)
- Raspberry Pi (small, single-board computer) and DHT11 (temperature and humidity sensor)
- CloudAMQP free account (message queue)
- ElephantSQL free account (Database as a Service)
- Flask (micro-web framework)
You have also used a microservice-style framework to create an application that:
- Would rarely break
- Persists data, keeping it safe
- Avoids time-outs due to traffic
- Transfers data across different languages and technologies
- Can be scaled quickly and easily
If you have questions or comments about this tutorial or the information found within, please reach out to us on contact@cloudamqp.com